

If you are using Stripe Billing or Stripe Invoicing but also using Xero as your financial platform, you will want to ensure that you have the Stripe bank feed set up.
The set up of your Stripe bank feed in Xero is well documented and can be found using the link below.
https://central.xero.com/s/article/Stripe-direct-feeds
You will note however that the instructions explicitly state that ‘Transactions that are made after your feed is connected import automatically’.
Transactions created prior to this are not automatically imported to the feed.
Below you will find comprehensive steps on how to import the history of your Stripe bank account.
Before you start, make sure that your Stripe Bank Account is activated in Xero and that you have at least one transaction available – make note of this transaction as we’ll need it later (this let’s us know where we can stop loading transactions).
Note: When first activated it may take up to 24hrs for the first Bank Account transaction to flow through from Stripe to Xero.
1. Export from Stripe
In Stripe go to the Balances screen and select the All Activity tab

then Press the Export button.
Set the date range to Custom and enter the date range you want to export. Start with the first Invoice in Xero that SubSync inserted, and finish before the newest bank transaction automatically inserted by Stripe into Xero (you noted this above). In this case we’ve picked the month of May. In the Columns menu select All columns, then press Export.
This will produce an excel file which will need a few changes made in order for it to be imported into Xero.
2. Update the file
Open the exported file in your favourite spreadsheet editor:
-
- The Dates that Stripe uses aren’t compatible with Xero – you will need to format the Created (UTC) column as a date
-
- As we’ll also be using this data to generate Stripe Fee items in Xero we’ll need to add two new columns to the right – call them Stripe Fee Description and Stripe Fee Amount
-
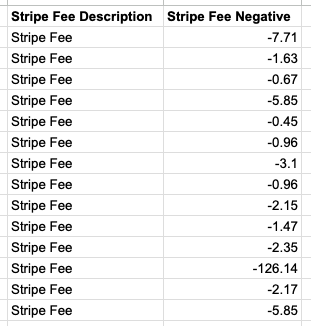
- In the Stripe Fee Description column enter the words “Stripe Fee” in every row (as per below)
-
- In the Stripe Fee Negative column we want to show a negative of the value in the Stripe Fee column that was exported from Stripe. To do this you can create a simple formula (e.g. =-E2 where E2 is the first row of the Stripe Fee column), then fill down for all rows. Check that the Stripe Fee and Stripe Fee Negative columns match values with the only difference being a negative value for the Stripe Fee Negative column.
Now save your work as a CSV for import into Xero.
3. Import Statement to Xero
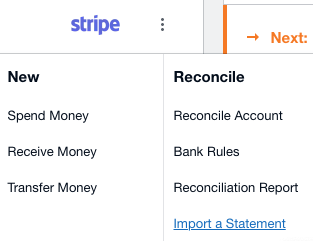
Go to Xero and in the Stripe Bank Account overflow menu (three vertical dots) (or Manage Account menu) and select Import a Statement
Use the Select file button to select the file you just exported from Stripe, then press Next.
Xero now allows you to map columns between Stripe and Xero. Map the fields as follows:
| Column heading from CSV file | Field in Xero |
|---|---|
| Type | Transaction Type |
| Source | Reference |
| Amount | Transaction Amount |
| Created (UTC) | Transaction Date |
| Description | Description |
Make sure the Don’t import the first line because they’re column headings checkbox is ticked.
Use the preview feature to check some of the records, then press the Next button when done. Another preview will be shown, then press the Complete Import button to bring the data into Xero.
You will now need to bring the Stripe Fees into Xero – these will be offset against the invoice amounts to come to a net position that will allow the account to balance. We’re going to repeat the process with a few changes.
Go back to the Stripe Bank Account overflow menu (three vertical dots) (or Manage Account menu) and
select Import a Statement again

Select the same file again then scroll to the bottom of the screen and select the Edit import settings button and change the column mappings:
| Column heading from CSV file | Field in Xero |
|---|---|
| Source | Reference |
| Created (UTC) | Transaction Date |
| Description | Description |
| Stripe Fee Description | Payee |
| Stripe Fee Amount | Transaction Amount |
Once you are happy you can press Next. Now conform that the data looks OK (there may be some $0 items that will be ignored as they don’t have fees). Press Complete Import when ready.
You will now have your transactions in the Stripe bank feed.
4. Reconcile your transactions
When it comes to reconciling these transactions there are a few options.
-
- You can create a bank rule that will allocate the ‘received’ and ‘spent’ to appropriate accounts
-
- Many users will manually create Xero invoices to reconcile the ‘received’ amounts against and Xero bills to reconcile the ‘spent’ amounts.
-
- You can use SubSync to automate the creation of invoices based on configured mapping rules. If you want to learn more about SubSync and how it can benefit your organisation please feel free to get in touch with us here.